Showing posts with label Trader Joe's white whole wheat flour. Show all posts

Monday, September 3, 2012

Seeded White and Whole Wheat Bread

My latest attempt to make delicious whole wheat seedy bread was a success.  I used a mix of white and white whole wheat flour, and added oats and more seeds to make it airier and give it more flavor.  I'm still refining the recipe, but my wife and I think it's a winner.

I'm still chasing that delicious bread we had on vacation in July, and while the White Whole Wheat Sunflower Seed Bread came out pretty good I'm trying to get a fluffier, airier bread with a crunchy, flavorful crust.  I'm going to do three things differently; I'm using white flour along with the white whole wheat flour, adding more seeds to the dough, and using water to better stick the seeds to the crust.

Ingredients
In two years I've hardly touched the sesame
seeds; today I used half the bottle


I've decided to add whole golden roasted flax seeds, old fashioned oats, and sesame seeds to the sunflower seeds the recipe calls for.  I added 1/4 cup of each of the flax seeds and oats, and about 1/8 of a cup of sesame seeds.  I was going to use 1/4 of a cup of sesame seeds but it seemed like too much, so I just estimated half of the 1/4 cup measure and added them all to the dough when the recipe instructs you to add 1/4 cup of sunflower seeds.

After 30 minutes the sponge
has puffed up quite a bit
The recipe calls for making a sponge, or a starter to activate the yeast.  The sponge is made with all the ingredients but only 1 1/2 cups of flour, then left to rise for 30 minutes.  I decided to use white flour for this portion of the recipe, and use the white whole wheat flour for the remaining 2 cups of flour in the recipe.

When I tried this recipe the first time (found here), I had a hard time keeping the seeds on the crust of the bread.  There were several different methods I found online for sticking the seeds to the bread, but this discussion on thefreshloaf.com was most useful to me.  One person suggested using an egg wash, which would definitely stick the seeds on there but somehow doesn't seem right to me.  It gives the crust a shine that is perfect for a sweet bread like challah or zopf, but I don't think the bread I'm trying to duplicate had a shiny crust.  Some recommended using egg whites, a little water, and a pinch of salt, but this would give the bread the same shiny crust.  I decided in the end just to spray the bread with water then sprinkle it with seeds right before baking in the oven.

Pouring the seeds for the crust
For the seeded coating I mixed sunflower seeds, flax seeds, and sesame seeds in a 1/2 cup measure.  I meant to add some of the oats to the outside as well but when the time came, I forgot.  Then when I started pouring the seed I realized I had prepared too much, but it was too late to anything about it really, and I decided to go for broke and pour it all.  For the sides I put my hand next to the bread to keep the seeds from bouncing off and going everywhere; some were lost but a lot stayed on.  This is going to be some seedy bread.

Just before going into the oven
I tried to touch the loaf as little as possible before putting it into the oven, so I didn't push the seeds into the outside of the bread.  I didn't want to compress it at all for fear of losing the airiness given off by the yeast.  When I picked it up from the above cutting board to put in the oven my fingers left indentations in the bread, but in the course of baking they disappeared.  I followed the adjusted cooking time and temperature and steamed the bread to create a crunchy crust like I did with the Sunflower Seed Bread and on the Forno Bravo website.

Fresh out of the oven
Letting the butter melt a bit
before rubbing it into the crust


The bread came out good, better I think than the Sunflower Seed Bread, but still not as airy as the bread I'm trying to make.  I wonder if I should give it even more than the close to three hours it had to rise, like overnight perhaps.  But I did enjoy it more than the Sunflower Seed Bread; the extra seeds gave it a nuttier flavor and it was great with just butter or with honey.  My wife thinks it's the best one yet and that it would be really good for sandwiches, but next time I won't use any white flour.  It didn't seem to make the bread fluffier at all, so there was no real benefit but a loss of fiber and nutrients.  I think the most important thing for next time is to let the bread rise overnight, but at least it does keep improving.

Ready to eat

Monday, August 13, 2012

Whole Wheat Sunflower Seed Bread

Again I will attempt to duplicate the delicious bread we had for breakfast every day on vacation last month.  It was a light and airy whole wheat bread with several different seeds on the crust.  Among the seeds on the bread were sunflower seeds, so I searched for a recipe for whole wheat sunflower seed bread and found this one from food.com: http://www.food.com/recipe/whole-wheat-bread-with-sunflower-seeds-123305.  The recipe is deceptively simple; the entire process is condensed into one step.  It has sunflower seeds in it and not on it, but later I'm going to experiment with adding them to the crust.

Whenever I get a recipe from a website I download a PDF of the recipe, and now that I have this blog I always recommend that you do the same, in case you enjoy the bread and can't find the recipe again.  Of course, I have a copy of it, so if it is unavailable at the above website leave a comment below or drop me an e-mail.  I can send it to you, provided I won't be violating any copyright laws.

The assembled ingredients
So again I'm using the white whole wheat flour from Trader Joe's, and this time I actually did some research as to what the difference is between it and regular whole wheat flour.  When I say research, I mean I read the Wikipedia page about them.  There are a few differences, the main one being that they come from different kinds of wheat.  White whole wheat flour comes from white hard spring wheat, rather than the red wheat traditional whole wheat flour comes from, and white whole wheat has a lower gluten content.  Gluten gives bread the light, airy texture by preventing the gas produced by the yeast from escaping the bread.  The recipe calls for 1/4 cup of gluten, so I added a pinch more to offset the difference between the flours.

Wheat gluten

Raw honey after stirring


The honey I used is raw honey that has all the pollen, bits of comb, and everything else that's in honey before it's refined into the homogenous syrup we're used to.  It might seem foolish to bake with raw honey, since heating it will kill some of the enzymes and negate the benefits of raw honey, but the only other honey we have is local honey and even more expensive.  It'll provide sugar for the yeast to react and give it good flavor, so raw honey it is.  I didn't think to take a picture of it before I stirred it up, but before stirring there is about an inch of comb and solids that has to be mixed in.  You can see the bits that are still stuck to the side of the jar, they give the honey a texture that makes it even more delicious.

The recipe doesn't say anything about warming the water, but I always thought that yeast reacts better in water between 130 and 140 degrees.  I decided to warm the water before adding it to the mix.  Everything but the flour goes in the mixing bowl and I used the dough hook on a low speed to mix it.  It's very fluid and when I turned up the mixer it started to spill, so take it slow.  Add 1 1/2 cups of the flour, mix again, and let stand for 30 minutes.

The sponge ready to ferment

I learned a new term from this recipe; it tells you to start with a sponge.  I knew this had to mean something other than a sponge used for cleaning, so I looked it up.  A sponge is like a bread starter.  You start the yeast fermenting early and it is supposed to help give the bread a more complex flavor, but I'm just following the instructions for this bread.  I'll play around with this more in future attempts.


Jack guarding the sponge as it rises

After 30 minutes, add the last 2 cups of flour and mix again.  I used the mixer and the dough hook as long as I could for this, but inevitably there is some dry flour left at the bottom that doesn't make it into the dough.  I used the spatula to try and fold the flour into the dough, but after a while the mixer wasn't cutting it anymore.  I took the dough out and flattened it a little, put the extra flour in the center, and kneaded it by hand from there.  It seemed a little dry, so I added a little water by wetting my hands then kneading until it's absorbed.

Kneading the dough
Working in the flour from the bottom of the bowl


The dough goes into a greased bowl to rise for 1 1/2 to 2 hours.  I always side with giving it more time to rise, so I set the kitchen timer for two hours and left it somewhere my cat can't get it.

The sunflower seeds didn't really stick
Before rolling in seeds


The recipe tells you to shape the dough and put it in a loaf pan, but the bread I'm trying to make was somewhere between a baguette shape and a loaf shape, so I tried to make my own shape without the loaf pan.  This would also let me use our pizza stone to cook it.  I rolled it in a tablespoon or two of sunflower seeds (above what the recipe calls for) but they didn't really stick.  I tried to pat the seeds into the bread then let it rise for another 30 minutes.  The sunflower seeds didn't stick very well then either; I kept having to push them in again.  While the dough was rising I decided to see what the internet thought about preheating the pizza stone or putting it in the oven cold.  What I found was a very informative website, a pizza oven company called Forno Bravo, and their page on steaming bread.  It's a company that makes gigantic pizza ovens for residential and commercial needs, and there's a lot to learn from this website so I'd recommend checking out some of the recipes and tips.  I learned a few techniques that I plan on using in the future, but there were two that I applied to this recipe.

Preheating the pizza stone

Spray bottle with water


First, I preheated the oven (with the stone inside) for 30-45 minutes at a temperature 75 degrees higher than the original recipe called for.  When the oven opens later during baking this will ensure the temperature is high enough.  Before preheating the oven I rearranged the oven racks so there would be plenty of room above the pizza stone to drop the dough onto, and space for a baking pan beneath.

Second, I brought two cups of water to a boil on the stovetop.  This will be used to steam the bread as it bakes, which helps give it a nice crust.  I got the spray bottle we use to discipline our cats (spray them with water when they misbehave) and got ready to put the bread in the oven.  I opened the oven and sprinkled some flour on the pizza stone to keep the bread from sticking, then slid the dough onto the stone.  I poured the boiling water into the baking pan, then used the spray bottle to spray the inside walls of the oven with water.  The Forno Bravo website said to do this three times, each 30 seconds after the previous spray.  I did the first, then forgot to do the second until 2 minutes had passed, then did the third after another minute or so.  In the course of spraying the walls of the oven I managed to spray the bread a little, but there wasn't much I could do about it once it happened.  I didn't get this part quite right, but next time I'll pay closer attention.

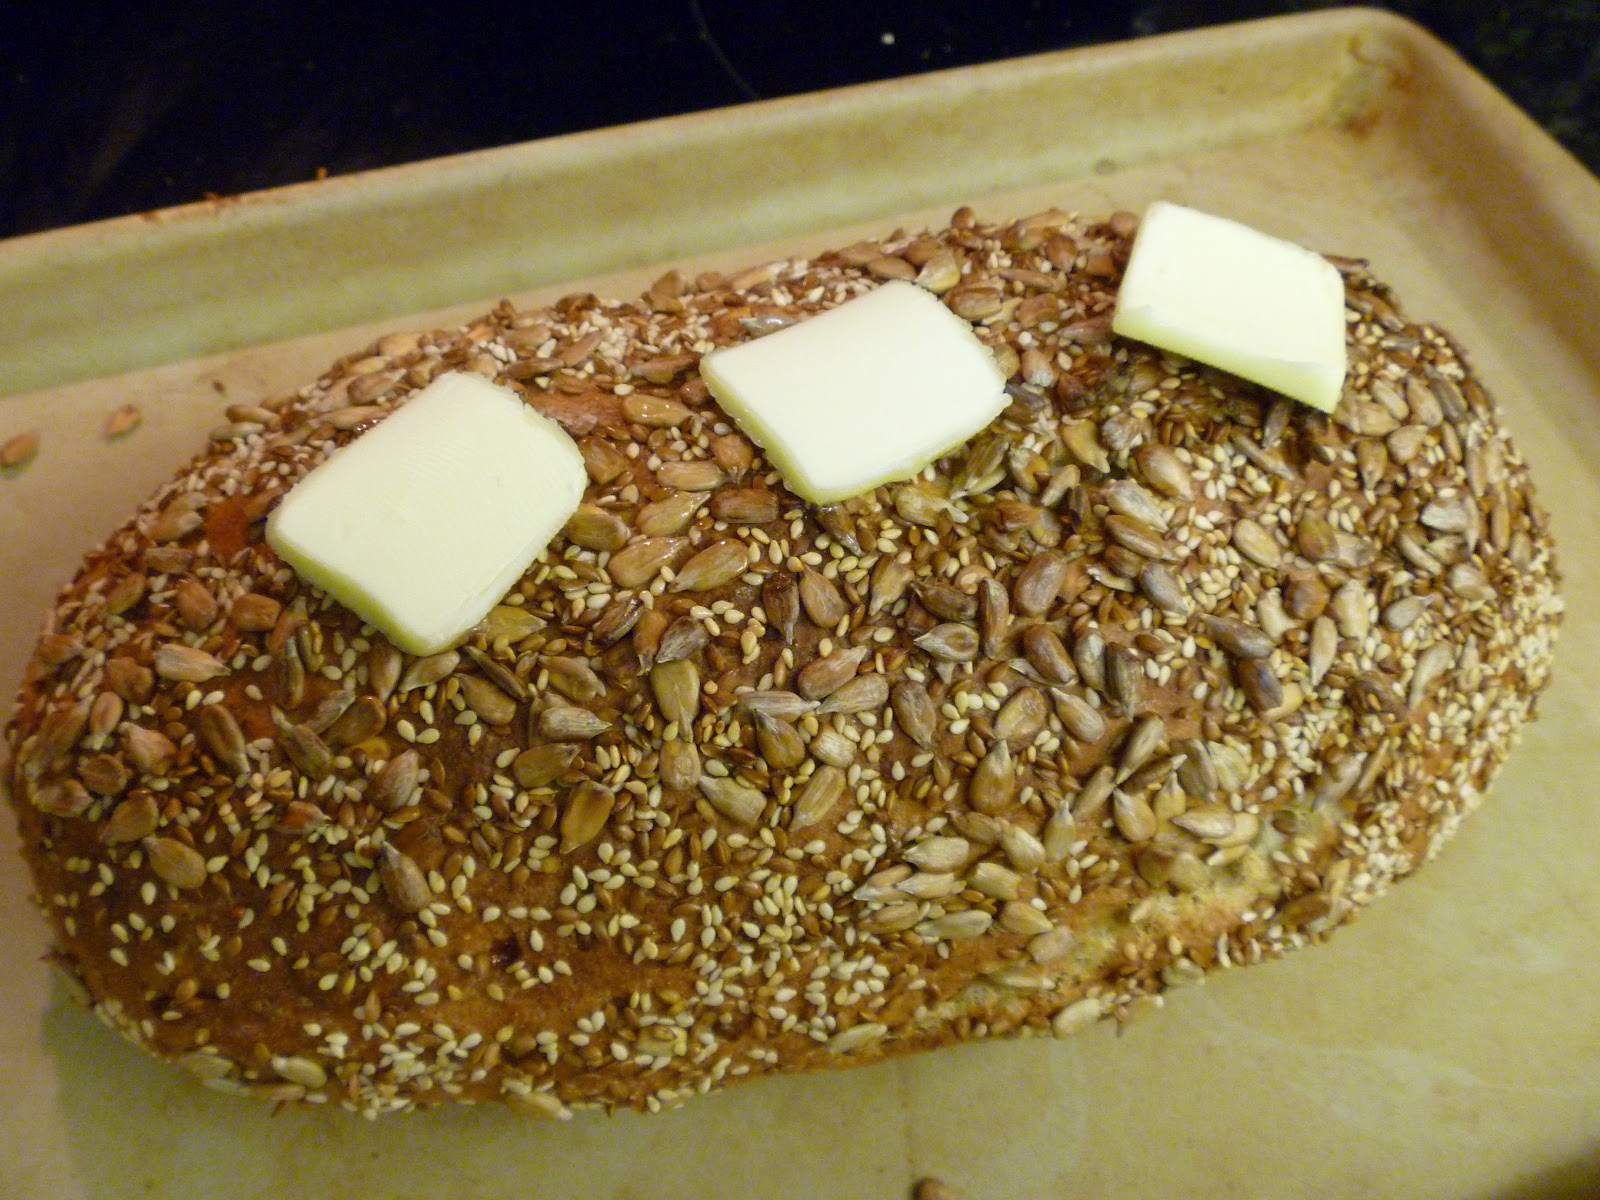
The baking pan with water provides the steam as the bread continues to bake, and boiling the water ensures that it turns to steam right away in the oven.  This bread made the apartment smell amazing as it cooked, and I had a good feeling about how it would come out.  When it was finished baking I tried to rub it with butter straight from the refrigerator but succeeded only in knocking lots of sunflower seeds off; I ended up cutting some small slices of butter and leaving them on top to melt before rubbing it in.

Just out of the oven, before rubbing with butter
Jack approves.  Rubbing with butter gives it a nice shine


It wasn't quite as airy as I hoped, but the flavor is great and it's not as dense as the Whole Wheat Walnut Bread.  The crust came out pretty good too with a nice crunch.  It's impossible to duplicate bread baked on the other side of the world due to small differences in the ingredients, in the water, and even in the composition of the air.  I may not ever be able to get it exact, but I'm getting closer.  I'm looking forward to breakfast tomorrow.

The finished product

Wednesday, August 1, 2012

Whole Wheat Walnut Bread

I know I promised Rahmschnitzel when I got back from vacation, but that would have required a trip to the grocery store this morning.  And in the immortal words of Sweet Brown, ain't nobody got time for that.  If you don't know who she is, do yourself a favor and watch the auto-tuned remix of the video that made her famous:


Our breakfast throughout vacation consisted of several delicious breads with butter and jam and honey and cheese and meat and yogurt, but one of the best breads was a wheat bread that had nuts.  I have Trader Joe's white whole wheat flour in the cupboard, and some walnuts, so I found this recipe for Whole Wheat Walnut Bread on the King Arthur flour website.  Download the PDF now if you're interested in trying this bread, because King Arthur may someday remove the recipe or change it.


About 7/8 of a cup
So apart from using TJ's white whole wheat bread instead of King Arthur, I stuck to the recipe.  I didn't have any orange juice, so I substituted water, but the recipe calls for a varied amount of water depending on the time of year or local climate.  It's summer in the northern hemisphere now, so I went with 7/8 of a cup of water.  As you can see below, I had to eyeball it because my pyrex doesn't measure eighths.  I used olive oil instead of vegetable oil because that was all we had.  I toyed with the idea of adding cashews if there weren't enough walnuts, but there were enough in the end.


I was using two hands, but needed one to take the picture


At first I was going to chop the walnuts on a cutting board with a knife, but there were so few left that I decided to just smash them up with my hands in the bag.  I think I should have used a knife, because I don't think I got them quite fine enough.  At least compared to the picture of the finished bread from the recipe.

There were enough walnuts


I put all the dry ingredients into the mixing bowl first, and dug a little hole in the center like the mouth of a cartoon volcano for the oil and water.  I used the dough hook and ran my Kitchenaid stand mixer at its lowest speed.  It didn't really mix the dough completely because it's a pretty dry dough.  I ended up kneading the dough right in the mixing bowl, then took it out and kneaded it on a cutting board for a while.  The dough seemed too dry to me, so as I was kneading it I would occasionally wet my hands slightly and keep kneading until it felt better.  It's hard to describe this exactly; when parts of the dough aren't sticking together and you've kneaded it quite a bit, you probably need a little more water.

Too dry!
After kneading in the bowl

 When the dough is ready, the recipe says to place it in a lightly greased bowl for 1 - 2 hours to rise before shaping it into a loaf.  I decided to go with the longer time, and gave it two solid hours.  I decided to use Trader Joe's organic virgin coconut oil to grease the bowl.  I use it for baking desserts and making crepes so I thought I'd give it a try for this bread.  Coconut oil is usually solid at room temperature but melts very quickly when heated, and I use it like shortening to grease things.  Take a dab from the top with a paper towel (one that won't shed little fibers into the food) and thinly coat the inside of whatever pan you're using.  This time of year it's liquid, so I dropped a little spoonful in the bowl and rubbed it around with my fingers.  It's supposed to be good for your skin too.

Liquid at room temperature this time of year

After two hours the recipe says to "gently deflate the dough," which is a process I am unfamiliar with.  I was going to look it up, but then I found myself with the dough in my hand starting to shape it into a loaf and found that the dough could be compressed easily.  That's probably what it meant by deflate the dough; I still haven't looked it up.  I greased the loaf pan with coconut oil again and shaped the dough as much like a log as I could.  To grease the plastic wrap I put over the loaf pan I rubbed it on the inside of the bowl the dough came out of, there was enough oil to coat it.

Coating the plastic

One more hour of rising, after moving to the loaf pan
Tented with foil

The recipe says to let the dough rise again, this time in the loaf pan.  I figured there was enough time before it would go in the oven, and I'm heating the oven anyway, I might as well make the herbed focaccia from my first blog post.  The timing was perfect, and now I have two breads from heating the oven only once.


Overall this dough had about 4 hours of rising before it went into the oven.  I baked for 20 minutes as instructed, then tented it with foil and gave it 20 minutes more.  The bread didn't look done to me so I gave it another five minutes but it still didn't look done.  I found my trusty meat thermometer to try and get the internal temperature of the bread (I don't have the instant read thermometer the recipe calls for).  I left it in the bread, re-tented the foil, and gave it another five minutes.   While the recipe says it should reach 190 degrees the temperature only ever got up to 170, but I felt that if I left it in any longer the bread would dry up.


I pulled the bread out and rubbed the top and sides with butter, probably about 2 tablespoons in all.  The large cracks in the bread that were there since kneading never went away, and the recipe is right.  This bread doesn't rise any more during baking.


First out of the oven

Buttering the top and sides

The final product
The bread didn't look nearly as fluffy as the bread pictured in the recipe.  I probably should have heated the water to between 130 degrees and 140 degrees; I think if the yeast had reacted more I would have gotten a lighter bread.  I will do that and also chop the walnuts more finely to get a more uniform distribution through the bread.  My wife liked it but I thought it was too dense, and it tasted nothing like the bread we had on vacation that inspired this experiment.  I haven't tried it with butter or anything yet, it might taste better for breakfast tomorrow.  I'll have to keep working on this recipe.